Showing posts with label Stazon. Show all posts

Monday, March 25, 2019

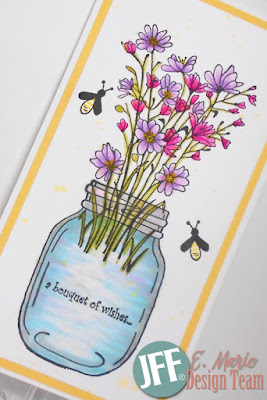
A Bouquet Of Wishes...


Just For Fun Rubber Stamps has many larger images that are perfect for a standard card.  I decided to combine two of these so I needed a longer card.  My card measures 7 ½” x 4”.


Their Large Canning Jar was stamped on white cardstock and then Nature's Bouquet was stamped, with the stems inside the jar.  Both were colored with watercolors.  Their Firefly Silhouette was stamped several times but yellow stripes were added to give the appearance of bees.


Yellow splatters were added to the front and this was layered on bright yellow.  This was made as a birthday card for my friend and fellow designer, April Williams, so the “a bouquet of wishes…” sentiment from JFF's Sentiments 1 Unmounted Sheet was stamped across the jar.


Don’t forget there are a few more days to enter Just For Fun's March Challenge with the theme of “Movement”.  See the details on their blog here.

Monday, February 25, 2019

Treasured Times


Have you seen the new fishing stamps that Just For Fun Rubber Stamps released earlier this year?  I recently received the Father and Child Fishing stamp.  I absolutely love this image.  It brings back so many memories of times I spent with my dad.


I picked up some paint chips a while ago (ok, over a year ago) because I saw so many cute cards made with them.  They have been sitting on my craft table waiting for a purpose.  I decided to finally use one for my background.  It was layered on white and, because it had a slight coating, Stazon ink was used for the images. 


The Father and Child Fishing and Water images from JFF were placed at the bottom light grey area and the Seagulls Silhouette (JFF) in the middle medium grey area.  I left the paint names on the chip partly due to needing the extra width and partly because I really liked the names.  The middle section is called Raven Wing and the bottom is Remember.


The sentiment, Treasured Times, was stamped in black and layered on white.  This was popped up at the top.

Have a wonderful week!

Tuesday, June 28, 2016

The Simple Wild Rose


http://sparklensprinkle.com/o/product_info.php?cPath=82_243&products_id=8690


A rose is one of my favorite flowers and since I am in Omaha right now, visiting with my mother, I am really enjoying all her roses.  She has so many bushes and even climbing roses.  She also has some lovely pink wild roses.  There is something about their delicate look that is so appealing.  I tried to tie that into today’s card featuring Sparkle N Sprinkle’s Wild Rose set and simple white layers with elegant lines.


I started with a white layer with the right side punched by a border punch.  A piece of sticker paper was layered behind it and Ballerina Velvet Glitter was added.  This was layered on the white card base.


The Wild Rose image was stamped with Jet Black StazOn ink on watercolor paper and colored with Zig Watercolor Markers.  The sentiment was stamped beneath the image and this was die cut with a Spellbinders’ Labels Seventeen Etched Die and layered on top of a slightly larger white die cut and added to the card front.  Dots of Sunny Daze Glitter was added to the flower centers, using a glue pen.


x
 x

Along with this lovely floral image, this set comes with four sentiments making it great to use for a variety of occasions.

Remember to stop and smell the roses this week.  Thank you for visiting my blog.


E. Marie

Wednesday, September 16, 2015

Scrapy Land Challenge #26


Today is a sad and happy day for me.  This is my last post as a Guest Designer for Scrapy Land.  I have really enjoyed it and hope to have the chance again.  They carry so many wonderful products and since I am truly “die-crazy” it is a great fit.  I am also excited to announce that I will be designing cards for Just For Fun Rubber Stamps.  I have known the owners for many years and am thrilled to be able to work with them this way.  Today’s project reflects products from both companies.

Scrapy Land Blog has a new challenge today.  Challenge 26 is “Add an Image (rubber or digi) and use any brand of die Scrapy Land sells.  Stamps and die cuts are a perfect combination and I use them together all the time.  This is a challenge you can’t resist!


My card begins with two pieces of watercolor paper. One was stamped with the Stamptangle Maple Leaf from Just For Fun, using Versamark Ink and heat embossing with Belgian Cream Opaque Embossing Powder.  Then it was colored with Color Bursts, using fall colors.  The second piece used darker tones and brown.  These were die cut with Memory Box Orchard Tree Frame and Debutante Frame and were layered on the card front.


The Stamptangle Maple Leaf was stamped on another piece of watercolor paper, colored with Color Bursts, and fussy cut.  After inking the edges with ink, it was curved and shaped and popped up on the card front.


Just for Fun’s Butterfly Trail was stamped on the background and covered with small brown pearls.  The Colorful Autumn Greetings was stamped and heat embossed with Indian Corn Embossing Powder and then cut out to look like a banner.   


Left over watercolor scraps were die cut with leaf dies from Sue Wilson Designs’ Finishing Touches Camellia Open Petals set.  These were slightly shaped and adhered around the tag and at the bottom of the card front.

Make sure you visit the Scrapy Land Blog to get the details on the challenge and prizes and see more inspiration from my fellow designers.

E. Marie


I entered this card in the following challenge:
Memory Box Challenge #4 Terrific Trees
Simon Says Stamps Monday Challenge: Love This Technique (Heat Embossing with Color Bursts)
As You Like It Challenge - Favorite Die (& why) - Memory Box Orchard Tree Frame because it creates a large scenic background.
Crafty Catz Challenge #292 - AUTUMN COLOURS

Monday, June 30, 2014

Sparkle N Sprinkle July Reveal Hop!


Welcome to Sparkle N Sprinkle's July 1st Reveal.


This month Sparkle N Sprinkle is introducing EIGHT new rubber stamp sets and Eight new coordinating digital sets.  Through July 3rd, the rubber stamp sets are 20% off their regular price.  


The new stamp sets are:

Under The Mistletoe #556 - (digital available)
Feline Humor #631 - (digital available)
Old Friends #633 - (digital available)
Gran's Chair #627 - (digital available)
Winter Stream #601 - (digital available)
A Savior #637 - (digital available)
Beach Friends #644 - (digital available)
Daisies #619 - (digital available)
x


The darling "Under the Mistletoe" rubber stamp set #556 is available on 
Cling Mounted Rubber,
as a Digital Image,
and is also included in This Month's Technique Video.
x
 x
On July 3 one Grand-Prize Winner will be selected from the comments left on the designers' blogs listed below.  The Grand Prize Winner will receive their choice of:

1) all the new rubber stamp sets
or
2) all the new digital stamps and digital stamp sets.
x
x
The new SNS Creative Challenge also begins today, with lots of prizes and recognition badges.
x
x
The winner of the blog hop will be announced on July 3 on Facebook, the SNS blog, and on our blogs:


x
Due to my daughter’s wedding in June, I chose not to be a participating designer for this reveal.  However, I did manage to complete a fun project and thought I would share it with you.


My friends accuse me of making my cards so complex and detailed, and this card might be a sample of why they say this.  Do you get a great, creative idea for a card and then you are determined to make it work.  That is what I did on this card.  Once I figured out all the measurements it wasn’t all that difficult.
 x


The card is created with layers of blue and white, with corners rounded and using the Distressed Embossing Powder Technique to add Blue Silver EP to the edges of the blue layers.  The card front uses the blue and white layers on top of a decorative layer created by punching around all the edges.  These are attached to an Easel Card base (see Easel Cards in SNS Tips and Techniques).
 x

 x

The layers were run through an embossing folder and the elegant angel image, from the Noel Angel set, was layered on the front.  It was stamped, colored, and fussy cut.  Then Cloud Nine, Jasper Blue, Daisy Velvet, Gypsy Red, Lator Gator, and Goldenrodvelvet glitters were added, using a glue pen.


The star was created using Spellbinders’ dies and the Creating Custom Glitter PaperTechnique.  It was popped up on the card with dimensionals.


x


The sentiments is heat embossed with Dark Night EP, die cut to look like a cloud, and edges distress embossed with Blue Silver EP.
x

x

x

 x
x


The card opens to reveal a wonderful surprise – another lovely image and a mini easel card.


The image was stamped and colored on top of Cloud Nine Velvet Glitter (see Stampingand Coloring on Glitter in Tips and Techniques).  It was fussy cut and layered on Spellbinders’ Asian Motif square, covered with more Blue Silver EP.  This is layered on a smaller Easel Card base adhered to the layered inside of the main card.


An embossing powder distressed blue layer is added to the inside, along with the die cut sentiment and pearls.
x

x


x

 x
x
x
x

When all parts are opened, you get the full scene of the Nativity with the angel and star above.  Though I might not make 50 of these for my Christmas cards, I love how this came out and the story it tells.

Now head on over to the SNS July Reveal Hop and visit my fellow designers, who have more amazing projects waiting for you.  Don't forget to leave them comments to get a chance to win this great prize.

E. Marie