Showing posts with label Sequins. Show all posts

Monday, June 10, 2019

Enjoy Life


So many things around us inspire what we create.  I recently spotted an embossing folder that also cut out a hot air balloon window and bought it immediately.  I knew just what I wanted to do with it and this is the card I am sharing today.


Even with a plan, this card did take a while to make as I did little parts at a time.  With my recent knee surgery, I could only sit with my leg down for a limited time so lots of interruptions.  I had made some backgrounds with alcohol inks and chose one that looked like sky and clouds and ran it through the folder.  I stamped the two Just For Fun balloons on the front and the heat embossed their Enjoy Life sentiment in white on the background layer, through the cut out window.  Acetate was placed behind the window and the embossed front was popped up to create a shaker window filled with sequins.


The JFF Flower Balloon and the Steam Punk Balloon were stamped and colored with Tombow Markers.  The circular balloon and the basket from each were cut out and layered on the front stamped images.  A few more sequins were added.

These stamptangle designs are a lot of fun to color and worked great with this folder.

What inspires your cards?


Sunday, March 10, 2019

Just For Fun March Challenge - Movement


Just For Fun Rubber Stamps Blog has a new challenge for the month of March.  The challenge theme is “Movement”!  Something on your card should wiggle, jiggle, slide, roll, flip or fold.    


There are so many different ways you can create movement on a card that it was hard for me to decide what I wanted to do.  I decided on a Waterfall Card.  I have always thought they look so fun but have never made one before.  This was my chance.  I chose a beach theme (Just For Fun has so many stamps for this) but you can use any theme and it really is a lot easier to make than it looks.  You can find a complete tutorial for one here.


The JFF Chambered Nautilus, Flip Flops, and Mother Baby Dolphins, and Palm Trees images were used on the flipping panels.  These were sponged with Distress Ink and layered on blue. 


The Summer Dreams sentiment from the Seasons Word Block was used on the pull down tab, along with the Stamptangle Seahorse, Sand Dollar, and  Pacific Scallop in the background.


The background was embossed with a Spellbinders’ folder and sequins, brads, and ribbon were added embellishments.

For more details and inspiration for this challenge, head over to the JFF Blog, here.

Monday, June 25, 2018

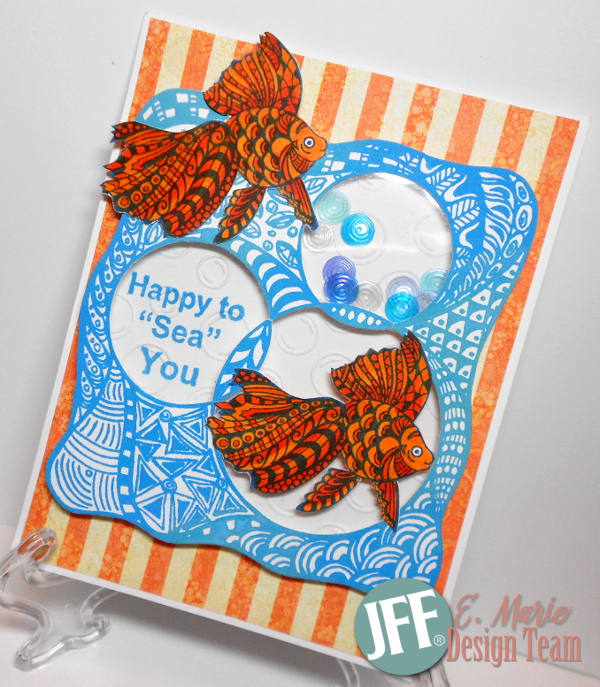
Happy To "Sea" You


I just had the most wonderful weekend, playing/stamping with my friends.  This is a card I created using Just For Fun’s StampTangle Tri-Circle Block.  It has three circles that make great windows for images and sayings and is also perfect for a shaker card.  I inked this stamptangle image with three different Distress Ink colors, though the variation in colors is hard to see in the pictures. 


After fussy cutting and cutting out the circle windows, a piece of clear acetate was adhered to the back.  This was popped up with foam tape over a white rectangle, stamped with the Happy to Sea You sentiment from JFF, and run through a bubble embossing folder.  Extra foam tape was placed all around the top circle to create a small shaker window.  This was layered on brightly striped cardstock from Graphic 45’s Sun Kissed collection.


JFF's Stamptangle Fancy Fish (Small) was stamped twice with Paris Dusk Memento Ink and colored with Copic Markers.  These were fussy cut and adhered to the card front. 

Thanks for stopping by!

Monday, January 15, 2018

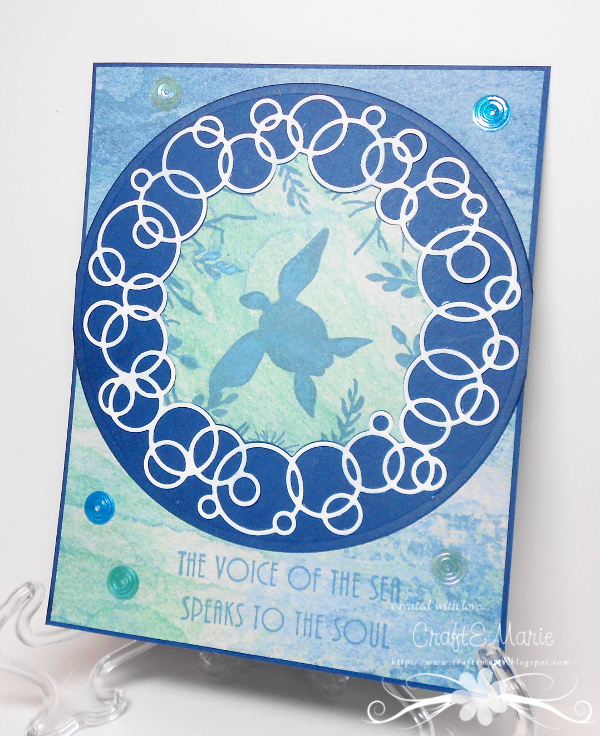
Waves, Bubbles, and Turtles


It has been a bit chilly so I am ready for some warmer beach time.  I’m thinking waves, bubbles, and sea turtles.


This card starts with the Loopy Loop Memory Box Die.  This was cut from white cardstock and layered on a large blue circle, cut with a Spellbinder’s Circle Nestability Die.


The Just for Fun Sea Turtle Seascape was stamped on decorative paper, then die cut with the Loopy Loop Die.  The center section was added to the center of the white die cut on the card front.


The same decorative paper was used for the card background.  The Voice of the Sea sentiment, also from JFF,  was stamped on the bottom of the card.  Some Hero Arts sequins from my stash were added.

Hope you have a fantastic week.

E. Marie

Monday, October 23, 2017

Moonlight Witch Silhouette Shaker


Watch out!  Guess what is sneaking up on us?  That hauntingly fun holiday, Halloween.  Just For Fun has some new stamps just for this, and today’s card uses the Moonlit Witch Silhouette.


The image was stamped with black Memento Ink two times, once on green for the card front and once on orange for the background.  The circular window was cut out of the card front and layered on black and a piece of acetate.  This was popped up and lined up with the orange background.  Halloween Greetings from the Sentiments 1 Unmounted Sheet was stamped at the bottom.


A variety of orange and lime green sequins, along with a few stars were added to the shaker window.

Have a great week.

E. Marie

Sunday, October 1, 2017

Just For Fun October Challenge


Time is a flying and now it is time for bats and witches.  October has arrived and Just For Fun Rubber Stamps has a new challenge for this month on their blog and it is all about “Halloween”.


My card uses JFF’s new Witches Magic.  After stamping with Memento Ink, the image was colored with Copic Markers and die cut using Spellbinders’ Nestabilities Art Deco Astoria Labels Etched Dies.


Ink was sponged around all the edges and the image was added to layers of designer paper.  I had this cute little vial of little black star sequins that were added to the card.

Head on over to the Just For Fun blog to see more creations from my fellow designers, along with all the details of the challenge.

E. Marie

Monday, January 23, 2017

Hi!


The weather where I live cannot make up its mind.  First we had a snow storm, a week later it was like summer, and now it is just cold with thunderstorms.  I am still feeling like winter so I made a cute snowman card to share.


I started by creating the background.  After tearing a piece of paper, I used it to mask the bottom and sponged on blue Weathered Wood Distress Ink on the top.  Then I used the vein stamps from two different Oak Leaf 2-Sided stamps from Just For Fun to make trees (E2689 and F3021).


The JFF Snowman image was stamped on the card front and then a second time on white cardstock.  This second image was colored with Tombow Markers and fussy cut.  Since the little arm branches are hard to cut out, I simply cut them off and colored the ones on the image on the card front.  The fussy cut image was layered on top and the arms lined up great.


The sentiment was die cut from the same snowflake background paper, using a Spellbinders’ Sentiment die.  The edges were inked and it was layered slightly offset on the same die cut from blue cardstock.  A little shading was added with a light grey Tombow marker and some little spiral sequins from Hero Arts were added to the background.

Here’s to better weather (though I do like being inside and being creative).

E. Marie

Sunday, July 3, 2016

A Grillin' Good Time


What are you doing for the 4th of July?  This is such a fun time for family and, of course, grilling out.  Sparkle N Sprinkle’s Summer Grilling Set #1 and Summer Grilling Set #2 are all about this.  I used the digital versions to create this card.


Both sides of a piece of white cardstock were punched with a Martha Stewart star border punch and adhered to a slightly larger piece of sticker paper.  Gypsy Red Velvet Glitter was added to the exposed adhesive on one side and Cobalt Glaze Velvet on the other side.  This was layered onto the card front.


Another piece of white cs was cut to fit just inside punched borders.  A circle shaped window was cut out using a Spellbinders die and a star shaped window was cut out using a Sizzix star die. 


 x
x
Strips of 1/8” "Tear-ific" Tape were run across a piece of Embossable Clear Acetate, the protective layer removed, and Black Suede Velvet Glitter was added.  This was adhered behind the circle window to look like a grill.  The little BBQ bottle from the Summer Grilling #1 digital set and the Oven Mitt from the Summer Gilling #2 digital set were printed, colored, and fussy cut.  These were added to the side of the grill.

More acetate was added behind the star window and a small shaker was created behind it with the printed sentiment from the Summer Grilling #2 digital set and blue and red sequins.  Additional sequins were glued to the card front.

Have a safe 4th!!

E. Marie

Monday, February 1, 2016

Valentine's LOVE


February is one of my favorite times to make cards.  I started making cards because I wanted them to be more personal and let friends and family know how special they are to me.  I want them to be extra special when they say “I love you”.


This Valentine’s card uses the Old Medicine Bottle and has the look of a shaker card.  It was stamped on two pieces of cardstock, one was cut out and layered over the other with a piece of acetate behind the cut out window and stamped cork to add to the look of the bottle.


I stamped and cut out the hearts from the Sentiment Hearts Mini Cube and layered these “inside” the bottle, popping up several of them.  Coordinating colored sequins were added inside and outside the bottle.


The Love Letters was stamped with Barn Door Distress Ink and edged with Spun Sugar and layered over the bottle. 

I like to think whoever receives this card will feel truly special.

E. Marie