
I love the look of a gold or silver outlined image combined with glitter. Sparkle N Sprinkle has a wonderful tutorial in our Tips and Techniques that shows how to use Outline Stickers with our Velvet Glitters to create some lovely cards. I also love to use dies with my cards and so why not combine all of these. I decided to create my own look of an outline sticker with my dies. Today I want to share 3 different ways to do this using the Memory Box Glowing Candles Steel Die.

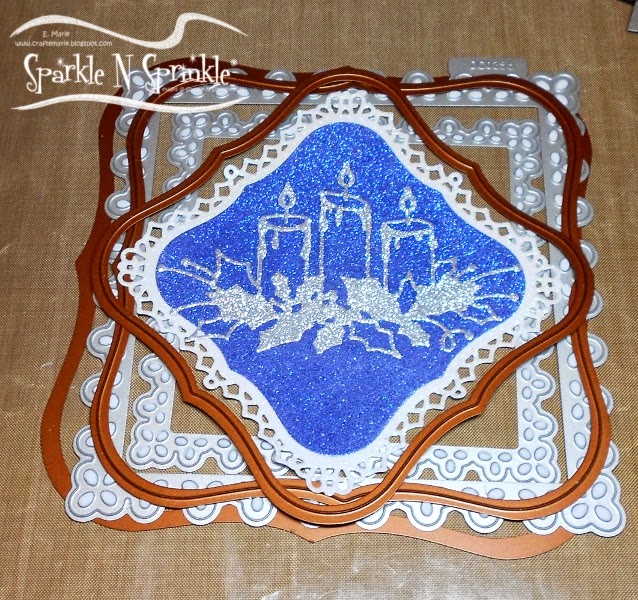
This first card uses the die cut with glitter to get this outline affect.

I die cut the Glowing Candles from sticker paper .

Next,
I cut a Spellbinders’ Labels One also from sticker paper, removed the
protective layer, and layered the die cut candles on top. I used the labels one protective layer to rub firmly over the die so it was securely adhered. After adding Cloud Nine Velvet Glitter to all the exposed adhesive, I removed the protective layer from the die cut and added Sonic Silver Velvet Glitter.

This creates a lovely silver outlined image that can be added to a variety of layers to create this card.

I used layers of Labels 1, Decorative Labels 1 and Grands Label 1 from Spellbinders and LifeStyle-Nesting Doily Squares
The card coloring was inspired when I did a practice layout of the dies. You never know what will inspired an idea!
The card coloring was inspired when I did a practice layout of the dies. You never know what will inspired an idea!

I wanted a more metallic look for this second variation of this technique.

I rubbed some Inka Gold Old Gold over the sticker paper and then die cut it. Note that this done on the back of the sticker paper and die cut from the back. This way you can remove the protective layer and use the sticky side to adhere it.

I chose to layer it on an oval die cut from cardstock covered with a Super Adhesive Sheet. Once again I used the protective layer to help buff the candle die cut onto the oval. I added Cloud Nine Velvet Glitter to the remaining exposed adhesive.

To complete the card I layered this oval on a scalloped oval covered with Super Adhesive Sheet and added Goldenrod Velvet Glitter to the remaining sticky scallops. This is added to layers die cut using Spellbinders’ Timeless Rectangles and more glitter.

A simple sentiment from Sparkle N Sprinkles' Nesties Ornaments set was stamped with Mega Tack Glue on a glittery Ribbon Banners die cut, also from Spellbinders.


Now you can remove the protective layer, one section at a time and add the different colors of glitter. I wanted more green (Lator Gator Velvet Glitter) and less gold (Goldenrod Velvet Glitter)
on the leaves so I trimmed some of the pieces of the protective layer
to mask off the areas I wanted green on the solid leaves, added the gold to the thin edges of adhesive that was exposed, then removed the “masks” and added the green glitter.

The glittery piece was added to layers of die cut cardstocks, surrounded by additional glitter.

Then I die cut the poinsettias from remaining cardstock covered with Super Adhesive Sheet. I covered them with glitter, and shaped them with a stylus (check out my Flower Making tutorial in SNS' Tips and Techniques). I layered them and added to the card front, along with the Christmas Holly sparkly sentiment on a another Ribbon Banners die cut.

I hope you try these different ideas and enjoy the look they provide. One quick tip – usually I recommend that you use your finger to buff down the glitter before you tap off the excess. To
avoid mixing the colors, I find it easier to tap off the excess from
each step and buff the glitter when your piece is complete. Should you have an area that needs some additional glitter, you can add some with a little brushable glue.
E. Marie
These cards are entered in
the following challenges:
Blue Glitter Card:
Craft Your Passion Challenge
195 – Fancy Borders/Edges
Suzy Bee's Blooming Challenge #10 - Anything Goes
Suzy Bee's Blooming Challenge #10 - Anything Goes
Gold Glittered Card
Creative Card Crew Challenge
52 – Anything Goes
Red With Poinsettias Card
Lexi’s Creations Challenge
#107 – Anything Goes
21 comments:
This is great Marie. I did something similar using the mirror cardstock, but this way, you can have whatever colors you want! Sheer genius! Great tutorial too. The cards are gorgeous.
Marie - they're gorgeous and it's a wonderful tutorial!!! Great job.
Gosh what you have done Marie is absolutely beautiful xx
These are beautiful projects !!
Mayra
Mayrasdesigns.blogspot.com
Thank you, Marie, for so detail tutorials. Your cards are magnificent!
Hugs,
Eret
Wow, these are fantastic and fabulous tutorials too, thanks for joining us at Crafty Sentiments this week. Jac x
Very pretty, as usual! Luv the inka gold use.. another clever use of a great product!
Kim
What a beauty and a wonderful festive mood.
Thank you for participating in the Creative Card Crew challenge. Adriana DT
These are stunning what a lovely way to use the outline stickers! Thanks for sharing with us at Lexis, Susan x
These are stunning what a lovely way to use the outline stickers! Thanks for sharing with us at Lexis, Susan x
These are stunning what a lovely way to use the outline stickers! Thanks for sharing with us at Lexis, Susan x
just popping by to thank you for entering our challenge at Allsorts with your amazing project!
All three are stunning, but I especially love the white with gold embossing. It's so classy! Thanks for sharing at Craft Your Passion. Hope to see you again.
Very nice your cards. I like them all.
Thanks for joining us at Craft your Passion.
xxx Michelle (DT)
These are stunning! Thank you for entering our challenge this month over at imagination crafts.
Hugs
Linda xxx
Beautiful glittery cards! Lovely layers and designs. Thank you so much for sharing with us at Simon Says Stamp Monday Challenge Blog!
Beautiful creations thanks for sharing at Lexis.
Hugs Julie x
wow! such wonderful cards, and tutorial, Miss Marie! I must have commented some where else on this because I remember emailing or commenting elsewhere LOL Safe trip, Marie, and thank you for sharing how you made the cards! hugs, de
Marie, each of these beautiful & sparkling cards is a treasure. Same die, yet such different looks. This candle die is one of my fav MB dies, and you have made it so versatile with the different techniques you shared. Appreciate the tutorial & all the pictures. Great job, and hope to see you at SBC one of these days. TFS & Hugs
Post a Comment