Sunday, May 22, 2011

May Flowers

Sorry I haven’t posted lately.  I thought I had recovered from being ill last weekend, but ended up at the doctor with an infection and dragged through the week at work.  The teacher I work with was out ill most of the week and we have so much to accomplish before the end of the year so I came home exhausted.  I didn’t even have the strength to drag myself to my craft room.  After a weekend of rest I finally felt more creative and decided to make a card.


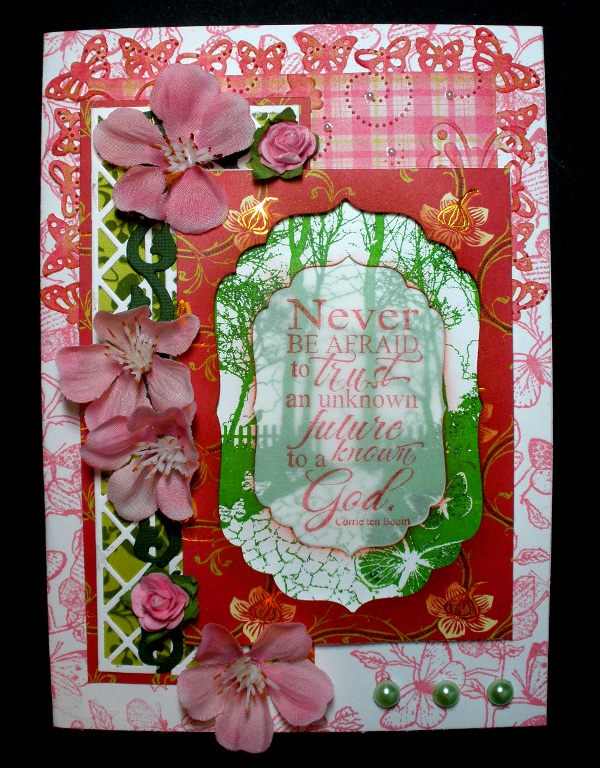
This card is made using one of my new Spellbinder Dies, Blossom Three.  I stamped this cute Penny Black Stamp on kraft cardstock and colored it with my Tombow markers.  I added a little white glimmer chalk to the tummy to lighten it.  I cut the image out using the two largest dies from the set and sponged the edges of each with blue ink.  I layered the largest section onto a white card cut out with the same die.  Then I used foam dots to pop up the image in the center.

I had this lovely lace with roses so I sponged yellow ink over the flowers and ran it around the edge of the popped up center shape.  I ran some yellow polka dot ribbon under the image and tied a bow.  Then I added a few more yellow flowers and three butterflies.  The butterflies are for the Simon Says Stamp and Show challenge of “Old Wives’ Tale”.  Did you know that three butterflies together mean good luck?  Hopefully they will bring me good luck in the challenges.

To give the card a bit of bling I added some tiny yellow jewels to the yellow flowers in the image and also in the center of each of the lace roses.  Then I added some blue jewels in the center of the larger yellow flowers.  These really made this card sparkle.

This card is entered in the following challenges:
Bunny Zoes Crafts Challenge #12 – Lace
Cute Card Thursday Challenge #165 – Let’s Get Krafty (stamp on kraft cardstock)
Speedy the Cat’s Friends Challenge #56 – Use tone on tone with focal image popped up.
Simon Says Stamps Challenge – Sparkle and Shine

Tuesday, May 17, 2011

Sparkle N Sprinkle Fancy Bird and a Hop

I promised you a peek at my “glitzy” version of my shoebox card.  This was actually the card I wanted to make to start with but needed to simplify it for the shoebox project.   I just received some amazing glitters from Sparkle N Sprinkle and I couldn’t wait to use them.    The card is based off of the following sketch used in their recent card challenge on their blog.


Go check it out.  While you are there check out their “The Not So Macho Masculine Card Blog Hop”.  The Hop is available to everyone through next Saturday Morning, May 21.  After 11 pm, two winners will be announced.  The Grand Prize is a stamp set of the winner’s choice AND as you visit each designer’s blog, she will not only tell you about her cards, but donate a product toward the grand prize!  Some of the products are brand new – not even on the website yet!  So the Grand Prize will consist of the stamp set PLUS 13 products! A lucky second winner will win a stamp set of her choice! 


Now to my card - I started with a white card base then added strips of 1/4" double sided "Tear-ific" Tape around the sides, leaving a small edge of white showing.  I embossed the blue cardstock with an embossing folder and placed it in the center of the card.  Using a sprinkle spoon I added Burgundy Glitz glitter to the remaining edge of tape. 

For the center of the card I cut three scalloped squares from green cardstock and stamped the Bird Swirl Tree image in dark blue ink on each one.  I colored the leaves on the image with pearlized ink, and then add the Burgundy Glitz glitter to the flowers using a Sakura glue pen.  I layered these onto three slightly larger squares of white cardstock, each edged with more 1/4" double sided "Tear-ific" Tape.  I added Starfire glitter to these edges and placed the squares down the center of the card with their corners overlapping.

I stamped the Fancy Bird image in blue onto white cardstock, cut it out with a label die, and used the glue pen to add Blue Lightning glitter over the image.  I edged the label with raspberry ink, then used foam tape to pop it up in the center of the card.  For the flowers I used Spellbinders Blossoms 3 die to cut two small flowers from sticker paper, cut 1/4” slits between each petal, and added Burgundy Glitz glitter.  I placed the flowers glitter side down onto a thick foam square and used an embossing tool with a large rounded tip to press down on the back of each petal, causing them to curl back.  I turned the flowers over and pushed down with the stencil tool around the center, causing the petals to lift up.  Using glue dots, I added the flowers to the two outer squares on the card and added a jewel to the center of each.

For the last touches I added green silk ribbon across the top of the card and three more jewels to the bottom left side.  This card is simple but all the amazing glitters really make it stand out.  All of the stamp images are from Sparkle N Sprinkle’s Bird Swirl Set. 

This card is entered in the following challenges:
Stamp Challenges – Anything Goes
Little Claire’s Designs Challenge #7 – Sparkle
Crafty Creations Challenges #118 - Anything Goes
Paper Play Challenges Week 19 - Anything Goes
Kaboodle Doodles Challenge #16 – Tic Tac Toe (Embossing, DieCut, Flowers)
Moving Along With The Times Challenge 98 – Two B’s (Bird and Bling)
Craft Us Crazy Challenge #8 – Favorite Embellishments and/or Something New (Favorites – Flowers/Jewels and New – Glitters/Stamps)

Sunday, May 15, 2011

Weekend At The Cottage!


What a wonderful weekend!!  Back in January I shared about my friend inviting me to a weekend she had won at a local scrapbook store.  They have this cottage (converted duplex) that you get to stay at for two nights and get to scrap/stamp all weekend until midnight on Fri. and Sat. and then until 4pm on Sunday.  So fun!!!  Well, my friend, Cheryl, won a weekend at a convention in spring so we did it again!!!  Do you see all the !!!!!!  That pretty much describes my weekend.  My only negative was that it started out with me being a bit sick, but I think I have recovered.  I just didn’t wear myself out quite as much (no all not parties).

There were about 14 people at the store on Friday afternoon and 10 of us stayed over in the cottage.  The store had invited Stacy from Stacy Stamps to teach some classes so several of us decided to go ahead and take one.  She has some beautiful stamps and we made five different cards.  Check back tomorrow to see what we worked on.  The store has a great little restaurant on one end of the store where we ate lunches, drank awesome Barnie’s coffee, and devoured delicious ice cream creations (chocolate ice cream with raspberries and almonds in a sugar cone is my favorite, though I did let them add a little Kahlua flavoring this time).  We went out to eat for supper in the evenings and even made a quick excursion to Michael’s one night.  I had to behave because I had already made a few Stacy Stamp purchases, plus Scrapbook Creations had a special sale on Saturday night with 30% off almost everything in the store (there were almost a few wrestling matches over some single items but most friendships survived).  I did buy one pack of K&Co. cardstock that was just too irresistible (50% off A.C. Moore coupon that really needed to be used) and a clearanced thick foam flower corkboard.  We were making flowers and needed these thick foam pads to work on and we were able to cut this into three pieces to share.
Several of us decided to do “shoebox” projects and I wanted to use a card I had been planning for quite a while.  I did a simplified version for my shoebox, since you are supposed to be able to make everyone’s cards in a few hours, not just one.  Below are pictures of the various cards we made.


Cheryl's Card


April's Card


Renee's Card


My Card (You can see my “glitzier” version of this card in my next post.)


The weekend went so fast.  We had a great time and it was hard to go back to our real lives.  The best part is that each of us spent enough money to get 2 – 4 more chances each in a drawing for another weekend.  Below are some pictures of us having lots of fun (thank you Renee for sending these) and here’s hoping it will happen again.  I am so lucky to have so many great friends and times like this to be together.


Sunday, May 8, 2011

Have a Very Mice Day!!


Happy Mother’s Day!!

I sure hope everyone had a day as wonderful as mine.  My oldest daughter actually remembered to call and wish me a Happy Mother’s Day in the midst of performing for two graduations and moving out of her dorm.  Thank you, Trisha!!  My youngest daughter even left her boyfriend’s side for the day to go out to eat with her father and I, cleaned up my bathroom, and baked cookies for me.  She also bought me some peanut M&M’s.  What a sweetheart!!  I have really wonderful daughters.  I was a good daughter, too, and called my mom.  She lives in Nebraska so I do not get to see her very often but I do try to call and check on her.

Not only did I spend time with family, but I also ate – way too much!!  We went to Olive Garden, one of my favorite places to eat, and then stopped at Starbuck’s on the way home to get a Frappuccino.  Quick advertisement here:  Starbuck’s has their fraps on sale ½ price this week between 3 – 5 pm.  Go for it!!  When we got home the caffeine from my Starbuck’s was trying it’s best to counteract my huge meal and I decided I would do my best to stay awake and finish up a few things in my craft room.  Ok, I will get to what you came here for – another card.


This card was a mix of colors and techniques.  House Mouse & Friends had the theme of travel but this really meant showing anything going from one place to another.  I spotted this stamp on my shelf that I hadn’t used forever and knew it was the one.  Simon Says wanted paper piecing and/or piercing so I decided to try both.  I started with a bright yellow card base, then added some turquois decorative cardstock with colored dots on it and I sponged the edges with ink.  Alas, I covered up most of those cute dots with the next layers.  On top of this on the left side I added a rectangle of pink polkadot cardstock.  Then I cut out a label from bright yellow cardstock, embossed it with a birthday themed embossing folder, and added Versamark ink to the embossing and a little pink ink around the edges.  ** A little tip here – It really helps if you cut out any shape before embossing.  If you emboss first, this starts the breakdown of the paper and it can tear easier when cutting it.  I layered this to the right side of the polkadot cardstock.

For the image, I stamped and embossed it on white cardstock and used Midnight Madness embossing powder from Sparkle N Sprinkle.  I cut out the entire image using a scalloped circle die and sponged the edges with ink.  Next I stamped and embossed the balloon from the image on pink polkadot cardstock and the mouse on light brown cardstock.  I added a little light pink coloring in areas on the mouse, using my Tombow markers, and then cut out both images.  I glued the balloon on top of the balloon on the white scalloped circle and then used foam tape to pop up the mouse onto it.  I colored the confetti with Tombows and then added lots of bling to the “air” bursting from the balloon.  I popped the scalloped circle onto the right side of the card.

For final touches I added a birthday candle border along the bottom edge of the card and behind the sentiment at the top.  Then I decided to add some stitching.  Sorry, I do not sew but decided to fake it.  A friend of mine just bought me this new roller that actually pierces little holes when you roll it along the edge.  I did this on several of the edges and then used a white jel pen to add the stitching.  I haven’t done this for a very long time but I thought it was a good touch that wouldn’t take away from all the sparkle and bling of the image.

This card was entered in the following challenges:
The Crafty Pad Challenge 120 – Spots and Dots
Simon Says Stamps Challenge – Paper Piecing and/or Piercing
Art Impressions Stamps Challenge 15 – Bling, Glitter, and Sparkle!
The Corrosive Challenge #114 – Turquoise and Pink
Ellaphantastic Challenge #26 – Birthday/Party
Paper Romance Challenge #49 – Favorite Die (Scalloped circle is one of my favorites to use)
Sentimental Sundays Challenge #54 – Anything Goes plus a Sentiment
Top Tip Tuesday #32 – Open (plus a tip  **See above)
Totally Stampalicious Challenge – Kicking It Old School (use a stamp that hasn’t seen ink in at least 6 months)

Friday, May 6, 2011

Sale at Bugaboo's New Store

Bugaboo has a new look and a new store!!!


Tammy at the Catch The Bug Blog has this to say:
Jodie has worked so hard to get the new store up and running.  She has worked many late nights to get this done and She Did it!!!  We now present the new and improved new Bugaboo Store!   
Before you run to check it out we have some important info to share with you!  The link to the
 new store link is http://bugaboostamps.com/

Please note this will change back to the Bugaboo address in a few days we will alert you when this happens and remind you to change your links.  We apologize for this minor inconvenience but trust me with the new store it is worth it!

First off for the month of May everything is 50 % off! So now is a great time to stock up. With the grand re-opening of the store we are offering up some wonderful prize packages for our loyal followers! You could be the winner of a $10 Gift Certificate, a $20 Gift Certificate, or you could be the lucky winner who gets 7 free images every month for the rest of 2011! That means
 you could be one of the lucky 8 winners!

To add to the excitement Jodie had just told me that every order placed in May will have their name placed in the pot for a chance to win one of five $20 gift certificates that she will be giving away at the end of the month!

How can you win you ask??
  Simply make sure you are a follower, create a post with the Bugaboo info above and then add your name to the inlinkz below.  You can grab the code from in linkz and your followers can also add their name from your blog but tell them to follow the rules check out the blog!  This will stay up until May 7th at 7am!  Help us spread the word that Bugaboo has  a new store and a new look.  After posting the news on your blog please add your name here for a chance to win come great prizes! 

Wednesday, May 4, 2011

Never Be Afraid

It took me awhile to get going on this card.  Today was very stressful and I came home and collapsed in my chair.  I had some ideas of cards I wanted to make but just couldn’t seem to get going.  After a quick nap and some supper, provided by some of the wonderful parents from school, I finally felt like I needed to go create something beautiful and inspiring for myself.  I hope it is for you, too.
The card base is a 5” x 7” white card and stamped the beautiful butterflies in pink around the edges.  This stamp is part of the Faith Set from Our Daily Bread Designs.  I took some pink and lime green plaid paper and used a Martha Stewart butterfly border/corner punch set around the edges.  Then I ran it through a Cuttlebug folder with swirls and butterflies and sponged the edges and embossing with dark pink ink.  I thought more of the embossing would show but I guess I made everything else larger than I meant to so I covered more of this paper.  I did add some tiny pearls to the ends of the embossed swirls.  I placed this decorative paper at the top center of the card. 


The next section was my “lattice”.  I started out with a layer of dark pink decorative floral designer paper and add some lovely lime green designer paper on top of it.  Then I cut out three small white decorative borders and two dark green vines, using a Cuttlebug die, and layered these on top of the green strip.  It really came out looking like a lattice with vines growing up it.

The final layer is the sentiment which comes from the As You Graduate stamp set, also from Our Daily Bread Designs.  I stamped the verse in dark pink on a piece of vellum.  Then I stamped the scenic background, from the same stamp set, in lime green on a piece of white cardstock.  I used a Spellbinder label die to cut out the center and sponged a little dark pink around the inside edge.  I layered this on top of the verse and took the middle section I had cut out and layered this behind the vellum verse.  This gave the continuation of the image but just a little lighter.  I took a little larger Spellbinder die and cut out another window from a rectangle of the dark pink decorative floral paper.  I popped this up with foam tape over the first section with the sentiment, and then adhered this to the middle right side of the card.

For embellishments I added a few pink silk flowers and two pink paper roses to my “lattice” and finished off with 3 lovely green pearls on the bottom right side of the card.  Even though I am tired because it is now quite late and I need to get to bed, my soul is refreshed from the joy of creating this card.  Now for some sleep and followed by a day of strawberry picking with my kindergarten class.  It is supposed to be a beautiful day tomorrow and the children will have so much fun.  We will all come back with muddy shoes and red juice stains on our lips and chins from the strawberries we weren’t supposed to eat.

This card is entered in the following challenges:
Joan’s Gardens Weekly Challenge #16 – Lime Green and Pink with a lattice, leaves to create a vine on the lattice, and Butterflies
Totally Gorjuss Challenge #78 - 1 of one thing (sentiment), 2 of another (mini roses) and 3 of something else (designer papers or green pearls
Our Daily Bread Designs Shining the Light ODBDSLC58 – Sketch


Stamp Challenges  - Things with Wings
Catch The Bug Blog Challenge – Make a Flower/Bright Color Project
CES Challenge #34 – Inspiration Picture
The Crafty Pad Challenge 119 – Pearls and Swirls

Monday, May 2, 2011

Thinking of You At This Time


I was working on some cards for challenges and I saw a sketch challenge at Little Claire's Designs with a fun sketch.  This card is using that sketch but turning it to work better with my image. 


The card base is dark brown.  I used a Martha Stewart corner/border punch on my next blue layer, and then added a decorative green layer.  I picked up this decorative cardstock at Tuesday Mornings for a very reasonable price.   It is double sided so I used the other side to cut small rectangles that I layered on more dark brown and attached to the left side, spacing slightly apart.

The image is from Sweet Stamps and was stamped and embossed on white cardstock and colored with my wonderful metallic watercolors.  They give it such a shimmer.  I used a die from My Favorite Things to cut it out and layered it on a light blue tag that I cut out using a Spellbinder die.  My only problem was finding the right sentiment to go the direction I wanted.  The few I had that were vertical just wouldn’t show up properly so I found this elegant “Thinking of You” that I thought would go great with the look I wanted this card to have and would express to someone that they were on my mind and in my heart in place of just stamping with sympathy.  I stamped and embossed it in brown on the light blue cardstock, cut out with a circle die, then sponged the edges with brown ink.  I used pop dots to attach both the image and the sentiment to the front of the card.

For embellishment I added pink pearls in each corner with small white pearls on each side, along with additional pearls throughout the card.  I also added glitter to the center of each flower, then two double layered butterflies around the sentiment.

The theme for the card swap for our stamp club was Feminine Birthday.  I really liked the look of this card but because I had to do so many I decided to simplify it.  I did not punch the edges of the blue layer, only used one single layer butterfly, and left off the pearls (I would have been all out of pears if I didn't).
For the sentiment I stamped and embossed it on brown cardstock and punched it out with a circle punch.  The brown showed up very nicely bringing out the words "Happy Birthday."  Even with all the changes I think the card came out very pretty.  I had this cardstock for awhile so I was happy to find the perfect project to use it on.
This card is entered in the following challenges:
Sweet Stamps Challenge #12 – Sympathy
Stamp Challenges - Things with Wings
Cute Card Thursday Challenge #162 - Sketch (an old one or someone elses)
DYSU Challenge #17 - Make It Pop (3D effect)
Totally Gorjuss Challenge #78 -  1 of one thing (circle with sentiment), 2 of another (butterflies)  and 3 of something else (pink rectangles)!  http://totallygorjuss.blogspot.com