Wednesday, July 25, 2012

Sunshiny Day

Awhile back I bought this adorable duck stamp, Just Ducky (F7039), from Impression Obsession.  He is so precious and has quite the expression.  When I showed him to my friends they all ended up buying him, too.  He ended up in one of my piles but when I saw the Impression Obsession challenge this week I just had to dig him out. 


I used the sketch from Simon Says Stamps for this card, with a mixture of embossing and distressing.  The decorative paper at the bottom of the card is Seedling from Basic Grey's Green at Heart collection.  Behind the duck is the IO’s image, Flower Pot Stack (C1755), cut out with a Spellbinders’ circle die and layered on a lovely Circle MultiFrame Die from Nellie Snellen.  The sentiment is Sunshiny Day (B5451), also from Impression Obsession. 

Hope you have a sunshiny day! 

E. Marie 

This card is entered in the following challenges:
Basic Grey Challenge 73 – Things With Wings
Top Tip Tuesday Challenge 81 – All About Circles
AllSorts Challenge 164 – Distressing
Charisma Cardz Challenge #28 – Your Favorite Animal
Crafts 4 Eternity Challenge R#81 – Crazy Circles
Art Impressions Stamps Challenge 72 – Photo Inspiration


Tuesday, July 24, 2012

Parchment Snowflake

I have been spending some time in my craftroom trying to put a few things away.  I am terrible about pulling out stuff and then just setting it on my table in a pile instead of putting it back where it belongs.  Sound familiar?  Well, I found my heavy vellum and decided to make a card with it. 


I love white embossing on vellum or parchment because it always looks so elegant.  For this card I used Sweet Stamps’ Open Hearts Medallion for the snowflake and heat embosses using Sparkle N Sprinkle’s Vanilla Ice embossing powder on vellum.  Then I used a stylus tool to dry emboss from the back around the outer sections and swirls.  Another thing I found while cleaning my room was my grid, which I misplaced before I even used it.  Grrrrr.  I used it to create the little embossed dots in various areas.  Then I used a 4-Split Perforating Tool to “punch” it out, giving it a lovely lacy look on the edges. 

For the background I ran another piece of vellum through Marianne Designs’ SwirlsEmbossing/Cutting Folder.  I layered it on white cardstock and a layer of silver and added some lace and ribbon.  The ribbon had a little silver design running through it that really coordinated with the embossed snowflake, which I popped up in the middle of the card.  All of this was added to a white card base.   

I had punched several snowflake borders to try with this card but decided they would take away from the gorgeous snowflake.  I had the little leftover punched snowflakes laying on the table and decided to add a few of these to the card.  I brushed them with a Versamarker and heat embossed with more VanillaIce EP.  I glued them on top of the background swirls and added a pearl in the center of each.  For the final touch I added a lovely satin fabric brad to the center of my snowflake and added a few tiny pearls. 

I loved how this turned out and I hope you do too.  It inspired me to stay up and work on a few more vellum cards so watch out!!  There are more to come. 

Hugs, 

E. Marie 

This card is entered in the following challenges:
SweetStamps.comBlog Challenge #74 Christmas Parchment
Bunny Zoe's Crafts Challenge 26 – Swirls and Lace
Speedy Fox and Friends Challenge Week 117 - Christmas in July
Paper Play Challenge Week 29- Christmas in July
CCW July Mini Challenge - Monochrome Theme
FlourishesTimeless Tuesday # 179 (FTTC 179) - Christmas in July
Paper Pretties Wednesday Challenge PWC215 – Bling It On!!

Sunday, July 22, 2012

Nature Multi Fold Card

The card I am sharing today is one I have been wanting to make for a while.   Since we are having an in-house contest to create projects with "unusual folds” I decided now would be a good time to try it.

Nature is another one of the new sets just release by Sparkle N Sprinkle.  With the great variety of images and sentiments in this new set, it works perfectly with this multi fold card.


For the base card I started with an 8 ½” x 11” piece of white cardstock. I scored down the center lengthwise and then scored at 2 ¾” from each of the 8 ½” sides.  I cut out the two side rectangles created by the score marks on the top half only and trimmed off ¼” along the top of the remaining flap before using a border punch to create a decorative edge.

I used a mixture of light yellow, green, and three different coordinating decorative cardstocks from Basic Grey to create layers to decorate the outside of the top flap, the two remaining side flaps, and the inside middle of the card. 


The images I used are Mushroom Patch, Nature's Dragonfly, and Nature's Butterfly.  I stamped them with Rich Cocoa Memento Ink, color them with alcohol markers, and cut them out.  Using a glue pen, I added Fascination Glitter, Imagination Glitter, Parisian Mist Glitter, Priceless Peacock Glitter, and Sunny Daze Glitter to various areas of the images.


The mini card on the front has the word Nature and the cut out dragonfly on the front and the sentiment from the Simply Beautiful Set and the dragonfly image on the inside. 


I added the cut out Mushroom Patch on the opened top flap and two border strips, created by by running a strip of cardstock down the center of 1/4" DoubleSided "Tear-ific Tape” and adding Parisian Mist Glitter to revealed edges.


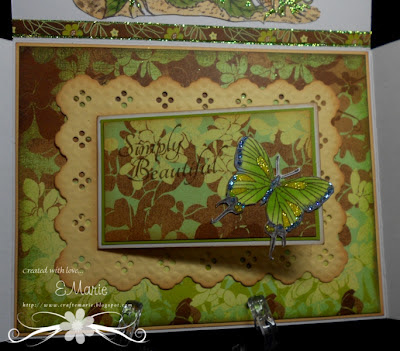
I used a light yellow lace rectangle die cut and another mini card inside the card.  Simply Beautiful is stamped in Rich Cocoa Memento Ink and the cut out butterfly is added to the front. 

Inside I stamped Enjoy The Moment, along with the butterfly and dragonfly.

Head to the Sparkle N Sprinkle Blog for more details on this card.  Complete directions to make this card will be in the Gallery soon.

The month of July is flying by so don’t forget about our Sketch Challenge that ends July 31st and our Design Team Call, ending July 27, 2012.  Check back on Tuesday for April’s latest Technique Tuesday and Aug 2-3 will be Our Furry Friends Blog Hop.

Try to stay cool this week!!


This card is entered in the following challenges:
Basic Grey Challenge #73 – Things With Wings (Used Origins Hot Stone and Brown Sugar Scrub; Oxford Finishing School)
Marianne’s Design Divas Challenge #12 - Anything goes (Used Lacy Rectangle Craftable and Frame and Swirls Creatable)
Crafts and Me Challenge #93 – R’n B/Ribbon and a Bow
Sentimental Sundays Challenge #112- Things with Wings
Stamptacular Sunday Challenge #173 – To DIE For
Stamp With Fun Challenge #1 71 – Lace Doily
Totally Gorjuss Challenge #141 – Leaf It In

Friday, July 20, 2012

More Christmas In July

SparkleN Sprinkle recently had a Christmas in July Blog Hop.  Since I still had lots of ideas in my head I decided to work on a few more cards.  I found this sentiment, Christmas Makes Me, that I really liked and knew I wanted to use it.


I heat embossed the sentiment with Concord Star Embossing Powder and cut it out with Spellbnders’ Circle Nesties, along with a slightly larger border.  I made this look like an ornament by adding Plantinum EP to a piece of 1/4" Double Sided "Tear-ific" Tape and added it to the top of the circles.  Great way to create a metal look that is self adhesive for borders or small areas.

I layered the “ornament”, along with Mr. and Mrs. P, onto a background created with Snow Flurries and more Concord Star EP.  For a little more glitz, I added Twinkling Clouds Sparkle N Soft to Mrs. P’s hat and used a glue pen to add some Starfire Glitter and Christmas Fire EP to the Holly and Holly Berries.  This was fun and simple to make.

Here’s to cooler weather.


This card is entered in the following challenges:
Paper Play Challenge Week 29 – Christmas In July  
Top Tip Tuesday Challenge #81 – It’s All About Circles (Tip - Making Metallic Tape)
Catch The Bug Christmas In July/Thursday – Sparkle and Shine
Delightful Sketches Weekly Challenge – Christmas In July 
Stamp and Create July Challenge – Hands Full of Love   
Paper Pretties Wednesday Challenge PWC215 – Bling It On!! 
Paper Pretties Monday Challenge PPMC48 – Embossing
Lexis Creations Challenge #69 - For A Friend
Crafts 4 Eternity Challenge R#81 - Crazy Circles

Floral Embossed Background

Today I am sharing a quick post to show a quick easy technique to create an awesome background.  Sparkle N Sprinkle’s 2 1/2" Double Sided "Tear-ific Tape", Super Adhesive Sheets, Sticker Paper, and their amazing choices of glitter and embossing powders, along with a simple piece of lace are all you need.


For my card I used a pieced of sticker paper, but all of the adhesives listed above can be used since they can all handle the heat of embossing.  I remove the top protective layer and laid the lace on top of it.  Then I used the protective layer to help press down the lace firmly.  I covered the whole piece with Cayenne Star EP, tapped off the excess, and gently removed the lace.  I heat set the embossing powder and when it had cooled I covered the entire sheet with Tuscan Sun EP.   Once again I shook off the excess and heat set.  I do like to use the protective layer to press the EP’s into the sticker paper each time to help it stick real good.  You can do this same technique with glitters or even a combination of EP’s and glitters.  Head over to SNS’s Tips and Techniques section to read more on this technique here and here. 

The sentiment on this card is Single Flower, embossed with Cayenne Star EP in the center of the Flourish Oval Frame.  I added a single Swirl Butterfly and some black pearl swirls for embellishment.  You can go here in my gallery to get full details on how to make this card. 

Check out my post, You're An Original, to see another sample of this technique, along with the sketch for this month’s Sketch Challenge.  You have until the end of July to enter, but don’t wait too long.  July is flying by!! 

See you again soon, 

E. Marie


This card is entered in the following challenges:
Bunny Zoe's Crafts Challenge 26 – Swirls and Lace
Corrosive Challenge #153 – Sentimentally  Yours 
Creative Card Crew Challenge #15 – Black Card Stock
Lexis Creations Challenge #69 – For A Friend  
Paper Pretties Wednesday Challenge PWC215 – Bling It On!! 
Paper Pretties Monday Challenge PPMC48 – Embossing  
Stamptacular Sunday Challenge #172 – Wings and Bling     

Friends and Birthdays

In my previous post I mentioned that I spent some time with my friends this weekend.  It was actually a time to celebrate two birthdays.  My friend, Cheryl, came from Charlotte for the weekend and five of us had a wonderful time together.  This week I made cards for Kim and Beverly using the new Panda’s Birthday set.  I thought I would share them with you.


This card was for Kim.  I used one of the sentiments from the set that was perfect for her.  Don’t panic, Kim.  I won’t tell them how old you are!!  She loves pandas so I knew she would enjoy this card.  Happy Birthday, Kim!!


The image is heat embossed with Ebony Spark embossing powder.  It is a rich black with lovely sparkle.  Then I used Dimensional Glue to add Twinkling Clouds Sparkle N Soft to the white areas.  I loved the way they turned out.


I made a similar card for Beverly, with the same image but using the other birthday sentiment from the set.  It was sooo fitting for her as this was a big milestone in birthdays.  Happy 70th Birthday, Bev!!

This is such a fun new set and even though my cards were for two girlfriends, it would also be great for a masculine card.

I’ll be back with more real soon.


This card is entered in the following challenges:
Speedy Fox and Friends Challenge Week 116 - Masculine Birthday
Charisma Cardz Challenge #28 - Your Favorite Animal

Thursday, July 19, 2012

Together We Have It All


Sparkle and Sprinkle has just released two new stamp sets that I know you are going to love.  Today I am sharing a card using the new Panda's Birthday set.  I spent Saturday with my friends at our favorite scrapbook store and I found this great decorative cardstock and ribbon that were perfect for this image. 


I stamped the image with Memento Tuxedo Black ink and colored it with markers.  I cut it out with Spellbinders’ Label Eighteen and layered this on dark green to help it stand out more on the card front.  The sentiment is Together and I stamped it in the middle of the embossed Flourish Oval Frame (using Moss EP).  To add a little sparkle (can’t forget that!!) I added some Sunny Daze Glitter, using a glue pen, to the middle of the flowers on the decorative cardstock. 

The second new stamp set is called Nature and can be seen here, along with some great card samples.  

Don’t forget to check out April’s latest Technique Tuesday at the Sparkle N Sprinkle Blog.  It is one of my favorites. 

E. Marie 

This card is entered in the following challenges:
Simon Says Stamp and Show Challenge: No Rules!
PaperPretties Monday Challenge PPMC48 – Embossing
Phindy'sPlace Challenge #113 – Initials (E – Embossing, M – Moss EP, B – Bamboo)


Sunday, July 15, 2012

And The Winners Are...

Thank you to everyone for joining us in the Christmas In July Blog Hop and for leaving so many loving comments.  Now it is time for what you have all been waiting for – THE WINNERS!!

The lucky winners are: 

Grand Prize #1 - Your choice of any stamp set on cling cushion

Debi


Grand Prize #2 - Your choice of any Stampette set on cling cushion 

Rhonda Miller


1st Place from April’s Blog - Any 2 glitter tinsels  

Dianne Potter


2nd Place from Shona’s blog - Any 3 glitters 

Auntie Em


3rd Place from Karin’s blog - Any 3 embossing powders 

Babe O 

AND……………As a special unannounced prize to celebrate our new digital images…………
Bonus Winner - Your choice of any 2 digital images 

Blessings From Cindy


Congratulations to each of you.  Please contact brenda@sparklensprinkle.com as soon as possible with your selections, your full name, address, e-mail & phone number. 

If you didn’t win this time, you will have another chance coming Aug 2-3.  Make sure you join us for our Furry Friends Blog Hop.  You can also have a chance to win a stamp set of your choice if you enter our current Sketch Challenge.  Check here for all the details. 

Hope you are have a wonderful weekend. 

E. Marie

Wednesday, July 11, 2012

Sparkle N Sprinkle Christmas In July Blog Hop!!


Welcome to the Sparkle N Sprinkle Christmas In July Blog Hop!!  It has been so hot but today it definitely cooled off so I am ready to think Christmas.  I hope you are, too!!  If you arrived here from Shona’s super blog, you are in the right place.  If you just happened by, I am glad to have you here but you might want to go to the Sparkle N Sprinkle blog and start from the beginning of the hop where you will find all the details.

The hop runs from July 12-13 and winners will be announced on Saturday, July 21st.  All you have to do is visit each of the designers’ blogs and leave a comment and you will have the chance to win one of Five great prizes.

Here is the order of designers for the hop:

Marie Berquist (your here)  
Don’t forget that we also have a Design Team Call going on through July 27th.  If you thing you would like to be a part of the fun and fabulous team, get details here. 

Sparkle N Sprinkle has just introduced digital stamps.  They are now offering Michelle Perkett’s complete line of digital stamps, some of which will also be offered as rubber stamps.  My first card uses Holly the Christmas Friendship Fairy Digital Stamp.


I printed this lovely image on white cardstock and colored it with markers and a Dove Blender.  I used Collegiate Garnet glitter on the centers of each poinsettia, Starfire Glitter on the wings, Bridal Glitter on the snow.  Twinkling Clouds Sparkle N Soft on the dress trim was added using dimensional glue so it really gives some shape to the image.  The green die cut border has Meadow Spark glitter added with a glue pen and the die cut poinsettias were edged with brushable glue and Collegiate Garnet Glitter. 

If you are not familiar with digital stamps, they can be printed in whatever size you need.  The lovely fairy I used is also available as a rubber stamp, if you prefer that.  You can see it here

I have one more project to share.  It isn’t Christmas without ornaments and so I am sharing one of my favorites that I make as gifts every year. 


These ornaments are made by embossing the image in gold on white tissue paper and glueing it on the inside of the glass ball.

Than ornament glue and glitter are added to cover the entire inside.  On this first ornament I used the Delight In The Joys sentiment and added Starfire Glitter. 


This ornament involves adding four images to the inside.  This can be a little tricky as you have to work carefully with the glue in placing each one.  I recommend that you start with only one image for your first ornaments.  I used Script Let It Snow and Snowflake 1.


I decided to add some color to the holly image from the Christmas Basket Stampette set.  I used colored pencils to color it, but you can also use permanent markers.  I also used Bridal glitter, and I love how it looked.


Full details of all my projects can be found in the gallery on the SNS website.  The card can be found here and the ornaments can be found at these links:  #1#2,  #3.Also, all the Christmas, Winter, Jewish and Christian images are on special - 15% off!  To view all of our specials, which also include a few glitters, embossing powders and flocking - just click here.  

Are you inspired to get started on those Christmas projects?  We still have more great ideas and inspiration for you so head on over to Karin’s creative blog to see what she has waiting for you. 

Thanks so much for hoppin’ by!! 


This card is entered in the following challenges: 

Card -
Stamping Scrapping July Challenge – Twinkle, Twinkle, Bling (Spellbinders Shapeability Holly Accents and Layered Poinsettieas)
Crafty Creations Challenge #178 – Free For All
Ladybugs Crafts Ink Challenge #64 – Christmas In July
Oldie But A Goodie Challenge - Flower Power (Poinsetiia Die)
The Pink Elephant Challenge TPE156 – Christmas In July
Stamp and Create July Challenge – Hands Full Of Love 

Ornament –
Corrosive Challenge #153 – Sentimentally Yours
MAWTT Challenge 154 – Make It Sentimental
ABC Christmas Challenge - N for Not a Card
Delightful Sketches - Bling and Bows
Flourishes Timeless Tuesday #177 (FTTC 177) - Sentimental

Monday, July 9, 2012

Snowflake Resist


I saw that Sweet Stamps Blog had a challenge for resist so I decided it was a good time to use my new Starflake Medallion that looks very much like a snowflake. I embossed it in white on white and brought out the design with blue ink. I embossed it in white on silver and cut out part of this to add a layer of silver in the middle. Then I embossed it on white and sponged it with blue ink again, only a little lighter, and cut out the middle to pop up in the center, along with a light blue snowflake jewel. All of this is cut out with Spellbinders’Grand Circle die


Behind the image I added a silver doily die cut with the Dutch Scallop Square die from Cheery Lynn.  The blue layer behind the doily was created by stamping and embossing just the outside border of Sweet Stamps’ Pansy Layers Frame on snowflake paper from DCWV.  I cut it out and layered it on silver and cut it out again.  I distress the edges and layered all of this on some lovely red, white, and blue paisley winter paper, also from DCWV.  I sponged the edges with a little blue ink, distressed the edges, and layered it on white cardstock that was turned blue on the edges with sponged ink.  Distressing it created a thin white edge and this is added to a white card base. 

I really wanted to add some ribbon but then saw this lovely jeweled swirl and new it was just what it needed.

E. Marie

This card is entered in the following challenges:
Sweet Stamps.comChallenge #72 - Christmas Resist
Cheery Lynn Designs Challenge 36 – Silver and/or Gold
Creative Card Crew Challenge #14 – Swirls and Pearls
AllSorts Challenge Week #162 – Red , White, and Blue
Crazy 4 Challenges C4C144 – "Show your Countries Pride” (Use color of your country’s flag-red, white, and blue)
The Pink Elephant TPE 156 – Christmas In July
Stampin Sisters In Christ Challenge #145 – At Least 1 Circle or Oval element, 2 different Papers, and 1 Embellishment
Charisma Cardz Challenge #26 – A Sketch